
Vue 项目中网页扫码功能的实现
- 鄢云峰
- 2026-02-24 11:19:40
- 2898
- 0
- YYF
开发环境: Vue2.x
这是最近项目中的一个需求(扫码签单),功能已实现,写篇文章记录一下,希望对有同样需求的朋友有所帮助。此功能的前提条件是:你的电脑必须要有摄像头,没有摄像头是无法进行测试的。我们项目是跑在平板上的,所以自带摄像头。
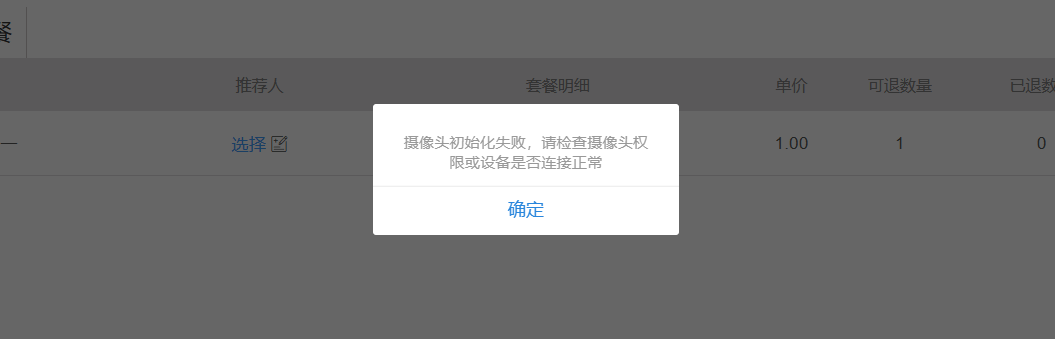
没有摄像头将会弹出如下错误信息
此功能的实现主要依赖于第三方库:html5-qrcode ,所以项目需要先安装此库。官方文档 https://scanapp.org/html5-qrcode-docs/docs/intro
npm install html5-qrcode为了方便使用,我封装了一个 QRCodeScanner 类,类的完整代码如下
import { Html5Qrcode, Html5QrcodeScanner } from "html5-qrcode"
export default class QRCodeScanner {
    constructor(containerId) {
        this.containerId = containerId; // 容器ID
        this.scanner = null;
        this.isScanning = false;
        this.onSuccessCallback = null;
        this.onErrorCallback = null;
    }

    async startScan(options = { fps: 10, qrbox: 250 }) {
        if (this.isScanning) {
            await this.stopScan();
            return;
        }

        // 默认配置
        const config = {
            fps: 5,
            qrbox: { width: 250, height: 250 },
            aspectRatio: 1.0,
            disableFlip: false,
            ...options
        }

        // 摄像头配置
        const cameraConfig = { facingMode: "environment" };

        try {
            // html5-qrcode 库提供了两个类,分别是 Html5Qrcode 和 Html5QrcodeScanner
            // 如果你想自定义扫码框的样式,则使用 Html5Qrcode 类
            // 如果你想使用自带的默认样式,则使用 Html5QrcodeScanner 类,它帮你封装了功能,使用起来比较简单

            // 我项目中是需要使用自定义样式的,所以使用的 Html5Qrcode
            this.scanner = new Html5Qrcode(this.containerId);

            // 直接启动摄像头
            await this.scanner.start(cameraConfig, config,
                (decodedText, decodedResult) => {
                    if (this.onSuccessCallback) {
                        this.onSuccessCallback(decodedText, decodedResult);
                    }
                },
                (errorMessage) => {
                    if (this.onErrorCallback) {
                        this.onErrorCallback(errorMessage);
                    }
                }
            );

            this.isScanning = true;
            return true;
        } catch (error) {
            console.error("启动扫码失败:", error);
            throw error;
        }
    }

    // 停止扫描
    async stopScan() {
        if (this.scanner && this.isScanning) {
            try {
                await this.scanner.stop();
                this.isScanning = false;
                return true;
            } catch (error) {
                console.error("停止扫码失败:", error);
                throw error;
            }
        }
        return false;
    }

    // 设置回调
    onSuccess(callback) {
        this.onSuccessCallback = callback;
    }

    onError(callback) {
        this.onErrorCallback = callback;
    }
}
类封装完之后,我又封装了一个组件(sign-order),因为需要扫码签单的地方比较多,所以做成组件比较方便。组件的完整代码如下:
<template>
    <div>
        <el-button type="primary" @click="signOrder">签单</el-button>


        <!-- 点击【签单】按钮,弹出此扫码框 -->
        <!--
            此扫码框并没有通过 v-if 来控制显示隐藏,而是通过绝对定位控制 left 来模拟的显示隐藏,之所这么做
            是因为如果通过 v-if 控制的话,初始化时,扫码容器会获取失败
         -->
        <div class="reader-box" :style="{left: left}">
            <!-- 容器 -->
            <div :id="containerId" style="width: 500px; height: 500px; background-color: rgba(0,0,0,0.3);"></div>

            <!-- 关闭按钮 -->
            <div style="display: flex; justify-content: center; align-items:center; height: 50px;">
                <el-button type="primary" @click="stopScan">关闭</el-button>
            </div>
        </div>
    </div>
</template>

<script>
import QRCodeScanner from '@/common/qrCodeScanner.js';
export default {
    props: {
        // 订单ID,调用签单接口所需的参数
        orderId: {
            type: String,
            required: true
        },

        // 容器ID,页面中有多个地方扫码时,避免容器ID重复,导致渲染异常
        containerId: {
            type: String,
            default: 'reader'
        }
    },
    data() {
        return {
            scanner: null,
            left: '500%',
            isScanSuccess: false,
        }
    },
    methods: {
        // 签单
        async signOrder() {
            if (this.left === '50%') {
                this.$alert('扫码器已启动,请勿重复操作');
                return;
            }
            if (!this.scanner) {
                this.scanner = new QRCodeScanner(containerId);
            }
            try {
                await this.scanner.startScan();
                console.log("摄像头已启动,开始扫码...");
            } catch (e) {
                console.error('Html5Qrcode加载失败:', e);
                this.$alert('摄像头初始化失败,请检查摄像头权限或设备是否连接正常');
                return;
            }
            // 设置回调
            this.scanner.onSuccess((text, result) => {
                if (!this.isScanSuccess) {

                    // 扫码成功调用签单接口
                    $request.api('/md/order/order_sign_bill', {
                        order_id: this.orderId,
                        member_code: text
                    }, (status, data, msg) => {
                        if (status != 1) {
                            this.$alert(msg);
                            this.stopScan();
                            return;
                        }
                        this.isScanSuccess = true;
                        this.$toast('操作成功');
                        this.stopScan()
                        this.$emit('sign-success');
                    })
                }
            });

            this.scanner.onError((error) => {
                console.log("扫码错误:", error);
            });
            this.left = '50%';
        },

        stopScan() {
            if (this.scanner) {
                this.scanner.stopScan();
                this.left = '500%';
            }
            this.left = '500%';
        },
    }
}
</script>

<!-- z-index: 999; 确保扫码框在页面的最上层 -->
<style scoped lang="less">
.reader-box {
    width: 500px;
    height: 550px;
    z-index: 999;
    position: fixed;
    top: 50%;
    left: 50%;
    background: #fff;
    transform: translate(-50%, -50%);
    border: 2px solid gray;
}
</style>
组件封装好了,现在来看具体如何使用。使用其实很简单,传入必要的参数 orderId,如果扫码成功有后续操作,则通过 sign-success 事件执行即可。
<sign-order :orderId="orderId" @sign-success="doSomething" />本文最后更新于 2026-02-24 11:24:18VUE
天生我材必有用,千金散尽还复来~~
作者:鄢云峰 YYF声明:转载请注明文章出处地址:https://yanyunfeng.com/article/89
评论
提交
来发第一个评论啦~